Black & Decker Toast-R-Oven / Broiler Calibration Curve
I got an old toaster oven for curing epoxy, e.g. Cactus Juice. The resin cures at 190-200° F (87-93° C), see manufacturer instructions, which is a relatively small window. I'm pretty sure that the curing process isn't all that sensitive to imprecision in this temperature, but I figured I'd calibrate the temperature gauge on the oven just in case. So below is a calibration build from setting the dial, waiting for it to equilibrate, then measuring the same spot on the inside of the oven. I used a laser thermometer, but an analog oven thermometer would probable be better as the laster is pretty sensitive to the reflectance of the surface you hit. Anyways, it's good enough.
Chart
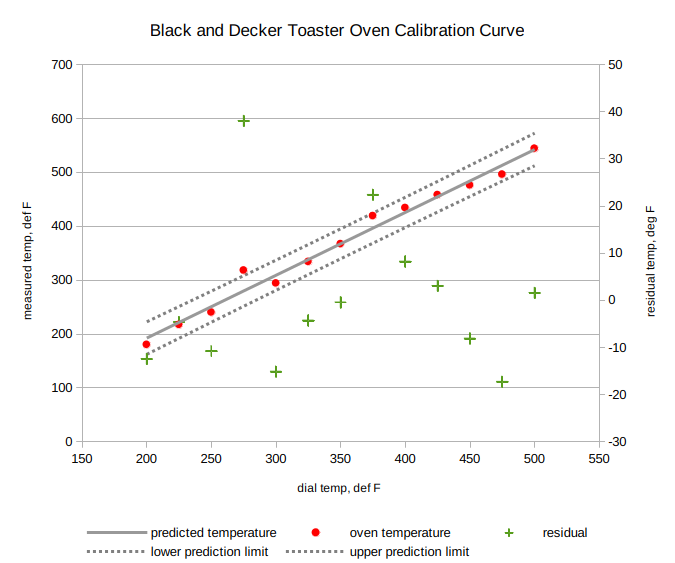
Coefficients for linear regression (r^2=0.98):
| coefficient | value |
| m | 1.16 |
| b | -40.84 |
Raw Data:
| dial temp | oven temperature | predicted | residual |
| 200 | 180 | 192.47 | -12.47 |
| 225 | 217 | 221.63 | -4.63 |
| 250 | 240 | 250.80 | -10.80 |
| 275 | 318 | 279.96 | 38.03 |
| 300 | 294 | 309.13 | -15.13 |
| 325 | 334 | 338.29 | -4.29 |
| 350 | 367 | 367.46 | -0.46 |
| 375 | 419 | 396.62 | 22.37 |
| 400 | 434 | 425.79 | 8.20 |
| 425 | 458 | 454.95 | 3.04 |
| 450 | 476 | 484.12 | -8.12 |
| 475 | 496 | 513.28 | -17.28 |
| 500 | 544 | 542.45 | 1.54 |
Tags: rock-prep, workflows, calibration
Stabilizing rocks with Cactus Juice, part 2
A follow up on my initial description of the CJ workflow:
I ended up leaving the samples in the oven over the weekend, which I don't think think hurt anything. The samples are definitely tougher in that they are not crumbly anymore. It remains to be seen how well they'll hold up to polishing, either by hand or on a lap wheel. George did a bit of polishing by hand, with somewhat mixed results. He said it was definitely holding up better than before, but it was definitely still delicate. Maybe the CJ is too old? I'm going to set a block of it by itself to see how it cures solo.
Stabilizing rocks with Cactus Juice
Brief backstory: I collected an oriented sample of a schist which displays a particularly nice SC fabric. I plan on making a thin section from the sample, but the hand-sample is so flaky that I'm afraid that if i try to cut a billet from the sample, the whole thing will fall apart. To combat this, I bought some Cactus Juice, which is a methacrylate ester monomer. This is commonly used by wood-turners for stabilizing punky but nicely-figured wood such that it can be turned on a lathe without simply falling apart. I found a video that describes using CJ successfully with rocks, Stabilize Your Lapidary Rock Properly Using Cactus Juice. Quick And Easy, so that's promising. I've had the CJ sitting around for 2 or so years and finally was motivated to use it because a student, George, has some chromite he collected in Montana that he'd like to stabilize in order to do some microprobe work.
Here's a short synopsis of what we've done so far:
- Mixed the CJ activator, shook it up, then let it set overnight. Shook it again in the morning and then again before actually using it.
- Made a small paper boat to try to minimize cleanup in case the stabilizer spilled.
- Placed samples in a paper starbucks coffee cup, which itself was sitting in the small boat.
- I would use a plastic container (the CJ manufacturer says to not use glass, not sure why) instead of paper. The resin ultimately soaked into the cup. I don't know if it was weakened structurally or leached anything into the uncured resin (which has a very low viscosity, much less than maple syrup). Not worth the risk.
- The two samples easily fit next to each other in the bottom of the cup. We poured in enough resin to completely cover them with about 0.5 cm of resin above.
- We used the vacuum oven in the probe lab, without turning on the heat (which would cause the resin to set prematurely!)
- The aluminum shelves were removed first
- We taped scrap paper to the walls, again in the hopes of minimizing the impact of spilling the resin. I'd read some things on the internet talking about how it can be frothy under vacuum, but this wasn't a problem, ultimately.
- We turned on the vacuum pump (Dolly) at 12:12.
- The samples started degassing as soon as the vacuum built up.
- It never got frothy, and it never splashed any resin out of the cup.
- The resin did soak into the cup material and into the paper boat. This may have only happened after we introduced pressure back in after degassing, which may have promoted capillary activity. Maybe.
- It bubbled vigorously for about 30 min, but after ~50 min it was only bubbling weakly.
- Closed the pump outlet valve (isolating chamber from pump) at 14:12.
- Very slowly opened inlet valve (allowing atmosphere into chamber) such that the resin wasn't disturbed by air inrush.
- Was originally going to let the samples sit in the resin for another 4 hours, but I got impatient after 3 hours.
- Oven was preheated to ~95 °C. I put the samples directly on the metal rack in the oven after letting them drip off excess resin.
- I'd prefer to put them on something, but I don't know what material to use that won't stick to the samples. Perhaps just stick with paper, and then just sand the paper off after?
- As of this afternoon, the samples are still in the oven.
- I recaptured as best I could the left over resin by passing it through a coffee filter. It flowed pretty easily. Vacuum-assisted filtration would probably help a lot for recovering a large amount of resin or if the resin had a lot of sediment that had accumulated in it, for instance if the sample wasn't cleaned before hand.
- I put the filter in the cup and then the both of them underneath the samples in the oven. Hopefully they'll catch any drips that might occurr. They'll also cure in the oven, which the manufacturer suggests should happen before throwing away any waste. That being said, the resin is supposed to be non-toxic and biodegradable, so it probably isn't absolutely necessary.
To be continued...